
There’s something truly comforting about a dessert that not only satisfies your sweet tooth but also brings the flavors of fall right to your kitchen. Have you ever tried using koginut squash in a dessert? If not, you’re in for a treat! This versatile squash, with its natural sweetness and smooth texture, makes the perfect base for a cozy, heartwarming dessert. Whether you’re looking for a new way to enjoy the flavors of autumn or need a healthy alternative to traditional sugary treats, this koginut squash dessert is sure to delight.
Imagine a creamy, spiced filling paired with warm cinnamon, nutmeg, and just the right amount of sweetness. It’s a perfect balance of comfort and flavor, making it ideal for family gatherings, holiday dinners, or simply an indulgent treat after a long day. Plus, it’s easy to prepare and can be customized for any dietary needs. Ready to try it? Let’s dive into this delicious, soul-soothing recipe!
Key Benefits
When it comes to desserts, it’s always a win when you can indulge without feeling guilty. That’s where koginut squash shines. Not only does it make for a delicious dessert base, but it also offers a range of health benefits that elevate this treat beyond just being a sweet bite.
Here’s why this koginut squash dessert is the perfect choice for your next cozy indulgence:
- Packed with Nutrients: Koginut squash is rich in vitamins A and C, both of which are essential for supporting healthy skin, immune function, and vision. It’s also a great source of fiber, helping to promote healthy digestion.
- Natural Sweetness: The natural sweetness of the squash means you can reduce the amount of added sugar, making this dessert a little bit lighter than your usual fall treats. You’ll still get that satisfying, sweet flavor, without going overboard on sugar.
- Versatile: Koginut squash is incredibly versatile. You can use it in everything from pies to puddings, muffins, and more. Whether you choose to bake it into a rich pie or turn it into a silky smooth mousse, the possibilities are endless.
- Perfect for Fall: With its autumn-inspired flavors and comforting texture, this squash dessert will transport you straight to cozy evenings, sipping tea by the fire. Spices like cinnamon and nutmeg pair beautifully with the squash, bringing that perfect fall warmth.
- Diet-Friendly Options: If you’re following a gluten-free, dairy-free, or even vegan diet, this dessert can easily be adapted to meet your needs. You can swap traditional ingredients for plant-based options, ensuring everyone can enjoy a slice.
This dessert isn’t just about indulging—it’s about nourishing your body with wholesome ingredients while still treating yourself to something special. Now that you know the benefits, let’s dive into how you can make this heartwarming treat at home!
Ingredients
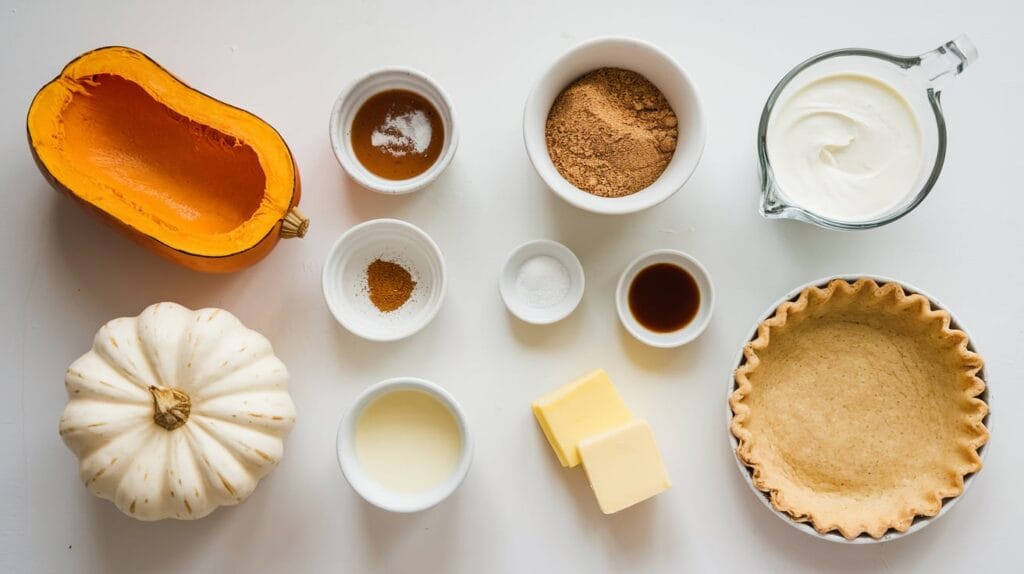
Before you get started, let’s gather all the essentials for your koginut squash dessert. This recipe uses simple, wholesome ingredients that come together beautifully, making it both easy to prepare and delicious to enjoy. Here’s everything you’ll need:
Main Ingredients:
- 2 cups roasted koginut squash: (pureed): This squash is the heart of the recipe, offering a natural sweetness that’s perfect for desserts. Roasting it brings out its deep, caramelized flavor, making the puree smooth and flavorful.
- 1/2 cup brown sugar: (or maple syrup): Sweetness is key here, and brown sugar adds a rich, molasses-like flavor that pairs perfectly with the squash. For a lighter, more natural sweetener, maple syrup works wonderfully.
- 1/4 teaspoon ground cinnamon: A warm spice that enhances the autumnal feel of this dessert. Cinnamon will make your kitchen smell amazing!
- 1/4 teaspoon ground nutmeg: Another classic fall spice that complements the squash and cinnamon beautifully, creating depth and warmth.
- 1/2 teaspoon vanilla extract: This elevates the flavor profile, adding a bit of sweetness and a fragrant note to the filling.
- 1/4 teaspoon salt: A pinch of salt balances the sweetness and enhances all the flavors, ensuring your dessert isn’t too cloying.
- 2 tablespoons butter: (or coconut oil for a dairy-free version): Butter adds richness and creaminess, but if you’re aiming for a dairy-free dessert, coconut oil is a great substitute.
- 1 cup heavy cream: (or coconut cream for a dairy-free version): The cream will give the filling a luscious, velvety texture. Coconut cream is a fantastic alternative if you’re making this dessert vegan or dairy-free.
- 1 pre-made pie crust: (or gluten-free crust if needed): To save time, a pre-made crust works wonders. If you need a gluten-free option, simply use a gluten-free pie crust or skip the crust altogether for a lighter, crustless version.
Optional Toppings:
- Whipped cream :(or coconut whipped cream): A dollop of whipped cream adds a light, airy finish. If you’re dairy-free, coconut whipped cream is a delicious alternative.
- Cinnamon sugar: A sprinkle of cinnamon sugar adds a bit of texture and an extra touch of sweetness for that perfect finishing touch.
Pro Tips:
- Roasting the Squash: Make sure to roast your koginut squash until it’s soft and tender—this will bring out its natural sugars and deepen its flavor. Roasting at 375°F for about 40 minutes should do the trick. Once it’s roasted, scoop out the flesh and puree it for that smooth, creamy texture.
- Make it Your Way: Feel free to experiment with spices. If you love ginger, a pinch of ground ginger can add a little zing to the dessert. Pumpkin spice is also a great way to amplify the autumn vibe and create a slightly different flavor profile.
- Vegan and Gluten-Free Options: If you’re making this dessert for those with dietary restrictions, don’t worry! Simply swap the butter for coconut oil and the heavy cream for coconut cream to make this a dairy-free and vegan dessert. You can also choose a gluten-free pie crust or go without the crust altogether.
Now that you’ve got everything ready, let’s move on to the next steps to bring this beautiful dessert to life!
How to Make Koginut Squash Dessert

Now that you’ve gathered your ingredients, it’s time to bring this cozy koginut squash dessert to life! The process is straightforward, and each step is designed to bring out the natural sweetness of the squash while combining the perfect balance of spices and creaminess. Let’s walk through the steps together, and don’t worry, I’ve got some helpful tips along the way to ensure your dessert turns out perfectly every time.
Step 1: Roast the Koginut Squash
The key to getting that deep, rich flavor from your koginut squash is roasting it. Here’s how:
- Preheat your oven to 375°F (190°C).
- Cut the koginut squash in half lengthwise and scoop out the seeds with a spoon.
- Place the squash halves, cut side down, on a baking sheet lined with parchment paper.
- Roast the squash for about 40 minutes, or until it’s soft and easily pierced with a fork. The caramelized edges will bring out the natural sugars, giving your dessert a lovely sweetness.
- Once roasted, scoop out the squash flesh and set it aside to cool slightly. You’ll need about 2 cups of pureed squash for the filling.
Step 2: Prepare the Filling
Now that your squash is roasted and ready, let’s turn it into a creamy, spiced filling:
- In a mixing bowl, combine the pureed koginut squash, brown sugar (or maple syrup if you prefer), cinnamon, nutmeg, and a pinch of salt.
- Add in the vanilla extract and butter (or coconut oil for a dairy-free version), stirring until everything is well combined.
- Slowly pour in the heavy cream (or coconut cream for a dairy-free twist) and stir until you have a smooth, velvety filling.
This step is where all the magic happens, as the flavors meld together beautifully. Take a quick taste to make sure it’s sweet enough for your liking; you can always adjust the sweetness at this point by adding a little more sugar or syrup.
Step 3: Assemble the Dessert
Time to bring it all together! Whether you’re using a pre-made pie crust or going crustless, this is a simple yet satisfying step:
- If you’re using a pie crust, carefully press it into a pie dish or tart pan. If you’re skipping the crust for a lighter option, just grease your dish well before pouring in the filling.
- Pour the squash mixture into the crust, smoothing the top with a spatula to ensure it’s even.
- Give the dish a gentle tap on the counter to release any air bubbles. This will ensure a smooth, even filling that bakes perfectly.
Step 4: Bake the Dessert
Pop your assembled dessert into the oven and let the baking begin:
- Bake at 350°F (175°C) for about 45 minutes if you’re using a pie crust, or 30-35 minutes for a crustless version. The dessert is done when the center is firm, but still slightly wobbly—kind of like a custard.
- You’ll notice the edges will start to turn golden brown, and the filling will set beautifully. Trust your senses—when it smells like warm spices and caramelized squash, you’re on the right track!
Step 5: Cool and Serve
Once your koginut squash dessert is out of the oven, let it cool to room temperature. Cooling ensures the filling has time to fully set, making for cleaner slices and a smoother texture. Here’s what to do:
- If you’ve made a pie, allow it to cool for at least an hour before slicing. This will ensure the filling has properly set.
- Top with a dollop of whipped cream (or coconut whipped cream if you’re going dairy-free) for extra indulgence. A sprinkle of cinnamon sugar can add a little crunch and enhance the flavors beautifully.
Pro Tip:
If you’re planning to make this dessert ahead of time, it stores beautifully in the fridge for up to 2-3 days. In fact, the flavors only get better after a night of resting. Just be sure to cover it tightly and let it come to room temperature before serving.
There you go! A cozy, seasonal koginut squash dessert that’s sure to warm you from the inside out. Whether it’s for a holiday gathering or a quiet evening at home, this treat is bound to impress. Enjoy every bite!
Pro Tips and Variations
Now that you’ve made this koginut squash dessert, it’s time to level up your recipe with some pro tips and fun variations. These little tweaks can make the dish uniquely yours and help ensure your dessert turns out perfectly every time. Whether you want to make it ahead of time or try a new twist on the flavors, I’ve got you covered.
Pro Tips for Perfecting Your Koginut Squash Dessert
- Roast the Squash Until Caramelized: For the best flavor, make sure you roast the koginut squash long enough so it becomes soft and slightly caramelized. This caramelization process enhances the natural sweetness and richness, making your dessert even more delicious.
- Balance Your Sweetness: The amount of brown sugar or maple syrup you use is totally up to you. If you prefer a less sweet dessert, start with the lower end of the sugar range and taste the filling before baking. You can always add a little more if you like it sweeter.
- Don’t Skip the Salt: It might seem odd to add salt to a dessert, but trust me—it balances the sweetness and elevates the overall flavor profile. Just a pinch can make all the difference, so don’t skip this step!
- Let It Cool: Allow your koginut squash dessert to cool completely before serving. Not only does this make for easier slicing, but the flavors also settle and intensify as it rests. I recommend letting it cool at room temperature for at least an hour.
- Use Fresh Spices: Freshly ground spices like cinnamon and nutmeg can make a big difference. If you have them on hand, grind your own spices for a more vibrant and aromatic flavor.
Variations to Try
This koginut squash dessert is highly adaptable, and there are plenty of ways to mix things up. Here are a few variations to try:
- Gluten-Free Version: If you need a gluten-free option, simply swap the pie crust for a gluten-free crust or skip the crust altogether and make it a crustless pie. It’s just as delicious and perfect for gluten-sensitive guests.
- Dairy-Free Delight: To make this dessert vegan or dairy-free, substitute coconut oil for butter and coconut cream for the heavy cream. The coconut flavor pairs wonderfully with the squash and adds a tropical touch!
- Add a Nutty Crunch: If you love a bit of texture, consider sprinkling chopped pecans or walnuts on top of the filling before baking. The nuts will toast up nicely in the oven, adding a delightful crunch.
- Spiced Up Version: Experiment with spices like ginger, cloves, or cardamom to give your dessert an extra kick. You can even add a little pumpkin spice for a more classic fall flavor.
- Sweeten with Honey: If you prefer a natural sweetener, swap out the brown sugar for honey or agave syrup. These options will add their own unique sweetness, making the dessert feel a bit lighter.
- Serve Warm with Ice Cream: For a decadent treat, serve your koginut squash dessert warm with a scoop of vanilla ice cream or coconut milk ice cream for a dairy-free version. The contrast between the warm dessert and cold ice cream is irresistible!
- Pair with Spiced Coffee: If you’re making this for a fall gathering, pair it with a cup of spiced coffee or chai tea. The warming spices complement each other perfectly and create a cozy vibe.
- Top with Whipped Cream: A dollop of whipped cream (or coconut whipped cream) is always a welcome addition. You can even sprinkle a bit of cinnamon sugar on top for an extra festive touch.
Pro Tip:
Make your dessert ahead of time! This koginut squash dessert actually improves in flavor if it sits for a day or two. After baking, simply cover it tightly and store it in the fridge. When you’re ready to serve, let it come to room temperature, and enjoy!
With these tips and variations, you’ll be able to tailor this koginut squash dessert to your personal taste, dietary preferences, and occasion. Whether you’re making it for a special celebration or just a cozy weekend treat, you’ll have a crowd-pleaser on your hands!
Serving Suggestions
Now that you’ve made your koginut squash dessert, let’s talk about the best ways to serve it. This dessert isn’t just delicious—it’s also a visual treat! Whether you’re serving it at a holiday gathering, a dinner party, or just treating yourself to something special, how you present it can really make a difference. Here are some thoughtful ways to elevate your squash dessert experience.
1. Garnish for Extra Flavor
- Whipped Cream or Coconut Whipped Cream: The simplest yet most indulgent topping! A dollop of fresh whipped cream adds a smooth, airy contrast to the creamy squash filling. If you’re going dairy-free, opt for coconut whipped cream it pairs beautifully with the flavors of the squash.
- Cinnamon Sugar: A quick sprinkle of cinnamon sugar on top right before serving adds a perfect balance of sweetness and spice. It also creates a light crunch that’s irresistible.
- Caramel Drizzle: Want to go a step further? Drizzle a bit of homemade or store-bought caramel sauce over the top for an extra layer of richness and sweetness that perfectly complements the squash.
2. Pair with a Beverage
The right drink can turn your koginut squash dessert into a full sensory experience. Here are a few pairing ideas to try:
- Hot Spiced Coffee: A warm, spiced cup of coffee with hints of cinnamon, nutmeg, and cloves will complement the flavors of the dessert beautifully.
- Chai Tea: The warming spices in chai tea think cardamom, cinnamon, and ginger pair perfectly with the earthy sweetness of the squash. It’s a cozy, comforting combination.
- Apple Cider: For a classic fall vibe, serve your dessert with a mug of hot apple cider. The tartness of the apple cider balances the sweetness of the dessert, while the spices match perfectly.
3. Presenting Your Dessert
Sometimes, a little presentation goes a long way in making a dessert feel extra special:
- Individual Servings: For a personal touch, serve the koginut squash dessert in individual ramekins or small mason jars. It gives the dessert a rustic charm and makes it easier to serve at a gathering.
- Garnish with Fresh Herbs: Add a pop of color and an earthy aroma with a small sprig of rosemary or sage as a garnish. These herbs not only look beautiful but also subtly enhance the dessert’s natural flavors.
- Edible Flowers: For an elegant touch, you can also add edible flowers like violets or pansies for a burst of color.
4. Make It a Complete Fall Meal
This koginut squash dessert can be part of a full autumn feast. Here’s a cozy fall menu idea to serve alongside it:
- Starter: Begin with a warm butternut squash soup or a fresh roasted beet salad with goat cheese.
- Main Course: Follow up with a hearty roast chicken with vegetables or a vegetarian pot pie filled with seasonal root vegetables.
- Dessert: Finish with the koginut squash dessert, a perfect sweet ending to a comforting meal.
5. Pro Tips for Serving
- Serve Warm with Ice Cream: This dessert is incredible on its own, but serving it warm with a scoop of vanilla ice cream can really take it to the next level. The cold, creamy ice cream melting into the warm dessert creates a satisfying contrast.
- Toppings for Texture: If you want to add a bit of crunch to balance the creaminess of the filling, sprinkle chopped pecans or walnuts on top before serving. The toasted nuts will add both texture and flavor.
- Chill for Enhanced Flavor: While this dessert is great warm, if you have time, let it cool and refrigerate it for a few hours (or overnight). The flavors will deepen and meld, making it even more delicious when served the next day.
Wrap-Up
There’s no wrong way to enjoy this koginut squash dessert, but with a few thoughtful touches and creative pairings, you can make it even more memorable. Whether you’re serving it for a cozy evening at home or a festive gathering, these ideas will help you present it in a way that delights both the eyes and the taste buds. Enjoy every bite of this comforting fall treat!
Conclusion
Congratulations! You’ve just created a delicious koginut squash dessert that will not only satisfy your sweet tooth but also warm your heart. This recipe is a true celebration of fall flavors, with the perfect blend of creamy squash, warm spices, and a tender, golden crust. Whether you’re baking it for a family gathering, a cozy dinner with friends, or just because you crave something comforting, this dessert is bound to impress.
Why You’ll Love This Dessert
- Simple yet Elegant: With just a few pantry staples, this dessert combines ease and elegance, making it perfect for both casual and special occasions.
- Versatile Flavor: The naturally sweet koginut squash pairs perfectly with spices like cinnamon, nutmeg, and a hint of vanilla, offering a warm, comforting flavor that’s perfect for cooler months.
- Make-Ahead Option: This dessert actually tastes even better the next day! It’s great for preparing in advance, allowing the flavors to settle and deepen.
A Few Final Thoughts
Whether you stick to the classic recipe or experiment with the pro tips and variations, this koginut squash dessert offers endless possibilities for customization. It’s a great dish to showcase your creativity in the kitchen while still delivering a comforting, crowd-pleasing result.
So, next time you’re looking for a fall dessert that’s not only delicious but also feels like a warm hug in a bowl, this is the recipe to turn to. Your family and friends will be asking for seconds, and you might just find yourself making this dessert again and again. Happy baking!
Pro Tip: Make sure to store any leftovers in an airtight container in the fridge. It will keep for up to 3-4 days, but the flavors only get better over time!
Enjoy your sweet, cozy creation and don’t forget to share the love!
___________________________________________________

koginut squash dessert
Ingredients
Main Ingredients:
- 2 cups roasted koginut squash pureed: This squash is the heart of the recipe, offering a natural sweetness that’s perfect for desserts. Roasting it brings out its deep, caramelized flavor, making the puree smooth and flavorful.
- 1/2 cup brown sugar or maple syrup: Sweetness is key here, and brown sugar adds a rich, molasses-like flavor that pairs perfectly with the squash. For a lighter, more natural sweetener, maple syrup works wonderfully.
- 1/4 teaspoon ground cinnamon: A warm spice that enhances the autumnal feel of this dessert. Cinnamon will make your kitchen smell amazing!
- 1/4 teaspoon ground nutmeg: Another classic fall spice that complements the squash and cinnamon beautifully creating depth and warmth.
- 1/2 teaspoon vanilla extract: This elevates the flavor profile adding a bit of sweetness and a fragrant note to the filling.
- 1/4 teaspoon salt: A pinch of salt balances the sweetness and enhances all the flavors ensuring your dessert isn’t too cloying.
- 2 tablespoons butter or coconut oil for a dairy-free version: Butter adds richness and creaminess, but if you’re aiming for a dairy-free dessert, coconut oil is a great substitute.
- 1 cup heavy cream or coconut cream for a dairy-free version: The cream will give the filling a luscious, velvety texture. Coconut cream is a fantastic alternative if you’re making this dessert vegan or dairy-free.
- 1 pre-made pie crust or gluten-free crust if needed: To save time, a pre-made crust works wonders. If you need a gluten-free option, simply use a gluten-free pie crust or skip the crust altogether for a lighter, crustless version.
Optional Toppings:
- Whipped cream or coconut whipped cream: A dollop of whipped cream adds a light, airy finish. If you’re dairy-free, coconut whipped cream is a delicious alternative.
- Cinnamon sugar: A sprinkle of cinnamon sugar adds a bit of texture and an extra touch of sweetness for that perfect finishing touch.
Pro Tips:
- Roasting the Squash: Make sure to roast your koginut squash until it’s soft and tender—this will bring out its natural sugars and deepen its flavor. Roasting at 375°F for about 40 minutes should do the trick. Once it’s roasted scoop out the flesh and puree it for that smooth, creamy texture.
- Make it Your Way: Feel free to experiment with spices. If you love ginger a pinch of ground ginger can add a little zing to the dessert. Pumpkin spice is also a great way to amplify the autumn vibe and create a slightly different flavor profile.
- Vegan and Gluten-Free Options: If you’re making this dessert for those with dietary restrictions don’t worry! Simply swap the butter for coconut oil and the heavy cream for coconut cream to make this a dairy-free and vegan dessert. You can also choose a gluten-free pie crust or go without the crust altogether.
- Now that you’ve got everything ready let’s move on to the next steps to bring this beautiful dessert to life!
Instructions
Step 1: Roast the Koginut Squash
- The key to getting that deep, rich flavor from your koginut squash is roasting it. Here’s how:
- Preheat your oven to 375°F (190°C).
- Cut the koginut squash in half lengthwise and scoop out the seeds with a spoon.
- Place the squash halves, cut side down, on a baking sheet lined with parchment paper.
- Roast the squash for about 40 minutes, or until it’s soft and easily pierced with a fork. The caramelized edges will bring out the natural sugars, giving your dessert a lovely sweetness.
- Once roasted, scoop out the squash flesh and set it aside to cool slightly. You’ll need about 2 cups of pureed squash for the filling.
Step 2: Prepare the Filling
- Now that your squash is roasted and ready, let’s turn it into a creamy, spiced filling:
- In a mixing bowl, combine the pureed koginut squash, brown sugar (or maple syrup if you prefer), cinnamon, nutmeg, and a pinch of salt.
- Add in the vanilla extract and butter (or coconut oil for a dairy-free version), stirring until everything is well combined.
- Slowly pour in the heavy cream (or coconut cream for a dairy-free twist) and stir until you have a smooth, velvety filling.
- This step is where all the magic happens, as the flavors meld together beautifully. Take a quick taste to make sure it’s sweet enough for your liking; you can always adjust the sweetness at this point by adding a little more sugar or syrup.
Step 3: Assemble the Dessert
- Time to bring it all together! Whether you’re using a pre-made pie crust or going crustless, this is a simple yet satisfying step:
- If you’re using a pie crust, carefully press it into a pie dish or tart pan. If you’re skipping the crust for a lighter option, just grease your dish well before pouring in the filling.
- Pour the squash mixture into the crust, smoothing the top with a spatula to ensure it’s even.
- Give the dish a gentle tap on the counter to release any air bubbles. This will ensure a smooth, even filling that bakes perfectly.
Step 4: Bake the Dessert
- Pop your assembled dessert into the oven and let the baking begin:
- Bake at 350°F (175°C) for about 45 minutes if you’re using a pie crust, or 30-35 minutes for a crustless version. The dessert is done when the center is firm, but still slightly wobbly—kind of like a custard.
- You’ll notice the edges will start to turn golden brown, and the filling will set beautifully. Trust your senses—when it smells like warm spices and caramelized squash, you’re on the right track!
Step 5: Cool and Serve
- Once your koginut squash dessert is out of the oven, let it cool to room temperature. Cooling ensures the filling has time to fully set, making for cleaner slices and a smoother texture. Here’s what to do:
- If you’ve made a pie, allow it to cool for at least an hour before slicing. This will ensure the filling has properly set.
- Top with a dollop of whipped cream (or coconut whipped cream if you’re going dairy-free) for extra indulgence. A sprinkle of cinnamon sugar can add a little crunch and enhance the flavors beautifully.
Pro Tip:
- If you’re planning to make this dessert ahead of time, it stores beautifully in the fridge for up to 2-3 days. In fact, the flavors only get better after a night of resting. Just be sure to cover it tightly and let it come to room temperature before serving.
- There you go! A cozy, seasonal koginut squash dessert that’s sure to warm you from the inside out. Whether it’s for a holiday gathering or a quiet evening at home, this treat is bound to impress. Enjoy every bite!
- Pro Tips and Variations
- Now that you’ve made this koginut squash dessert, it’s time to level up your recipe with some pro tips and fun variations. These little tweaks can make the dish uniquely yours and help ensure your dessert turns out perfectly every time. Whether you want to make it ahead of time or try a new twist on the flavors, I’ve got you covered.
Pro Tips for Perfecting Your Koginut Squash Dessert:
- Roast the Squash Until Caramelized: For the best flavor, make sure you roast the koginut squash long enough so it becomes soft and slightly caramelized. This caramelization process enhances the natural sweetness and richness, making your dessert even more delicious.
- Balance Your Sweetness: The amount of brown sugar or maple syrup you use is totally up to you. If you prefer a less sweet dessert, start with the lower end of the sugar range and taste the filling before baking. You can always add a little more if you like it sweeter.
- Don’t Skip the Salt: It might seem odd to add salt to a dessert, but trust me—it balances the sweetness and elevates the overall flavor profile. Just a pinch can make all the difference, so don’t skip this step!
- Let It Cool: Allow your koginut squash dessert to cool completely before serving. Not only does this make for easier slicing, but the flavors also settle and intensify as it rests. I recommend letting it cool at room temperature for at least an hour.
- Use Fresh Spices: Freshly ground spices like cinnamon and nutmeg can make a big difference. If you have them on hand, grind your own spices for a more vibrant and aromatic flavor.
- Variations to Try:
- This koginut squash dessert is highly adaptable, and there are plenty of ways to mix things up. Here are a few variations to try:
- Gluten-Free Version: If you need a gluten-free option, simply swap the pie crust for a gluten-free crust or skip the crust altogether and make it a crustless pie. It’s just as delicious and perfect for gluten-sensitive guests.
- Dairy-Free Delight: To make this dessert vegan or dairy-free, substitute coconut oil for butter and coconut cream for the heavy cream. The coconut flavor pairs wonderfully with the squash and adds a tropical touch!
- Add a Nutty Crunch: If you love a bit of texture, consider sprinkling chopped pecans or walnuts on top of the filling before baking. The nuts will toast up nicely in the oven, adding a delightful crunch.
- Spiced Up Version: Experiment with spices like ginger, cloves, or cardamom to give your dessert an extra kick. You can even add a little pumpkin spice for a more classic fall flavor.
- Sweeten with Honey: If you prefer a natural sweetener, swap out the brown sugar for honey or agave syrup. These options will add their own unique sweetness, making the dessert feel a bit lighter.
Notes
Nutrition Information (per serving)
- Calories: 200
- Fat: 10g
- Saturated Fat: 2g
- Trans Fat: 0g
- Cholesterol: 30mg
- Sodium: 100mg
- Carbohydrates: 29g
- Dietary Fiber: 3g
- Sugars: 12g
- Protein: 2g
- Vitamin A: 90% DV
- Vitamin C: 10% DV
- Calcium: 4% DV
- Iron: 6% DV
FAQs
1. Can I substitute koginut squash with other types of squash?
Yes, absolutely! While koginut squash is the star of this dessert because of its creamy texture and natural sweetness, you can substitute it with other squashes like butternut squash, acorn squash, or even delicata squash. Just be sure to cook the squash until it’s soft, then blend it to a smooth consistency. Each variety will bring its own subtle flavor, but the dessert will still be delicious!
2. Can I make this dessert in advance?
Yes, this is a perfect make-ahead dessert. You can prepare it a day or two in advance and store it in the fridge. The flavors actually deepen and become more pronounced the longer it sits. When you’re ready to serve, simply warm it in the oven for a few minutes or enjoy it chilled, depending on your preference. Either way, it’s a convenient option for busy days!
3. Is there a way to make this dessert gluten-free?
Definitely! If you’re looking for a gluten-free version, simply swap out the traditional pie crust for a gluten-free variety. You can find pre-made gluten-free pie crusts in most grocery stores, or you could even try a crustless version if you prefer. The filling is naturally gluten-free, so no adjustments are needed there!
4. Can I freeze this dessert?
Yes, you can! This koginut squash dessert freezes wonderfully. After baking, let it cool completely before wrapping it tightly in plastic wrap and aluminum foil or storing it in an airtight container. You can freeze it for up to 1-2 months. To reheat, simply thaw it in the fridge overnight and warm it up in the oven for a fresh-from-the-oven feel.
5. How do I know when my dessert is done baking?
Great question! The best way to check is to insert a knife or toothpick into the center of the dessert. If it comes out clean, or with just a few moist crumbs (not wet batter), it’s ready. You’ll also notice that the edges will be golden brown, and the center should feel firm to the touch, not jiggly. These are good indicators that it’s time to take it out of the oven.
6. Can I add nuts to the filling?
Yes, absolutely! If you love a bit of crunch, adding chopped walnuts, pecans, or almonds to the filling will add texture and a lovely nutty flavor. You can mix them into the filling before baking, or sprinkle them on top as a garnish for extra flair. It’s a great way to enhance the flavor and presentation of the dessert.
7. What’s the best way to serve this dessert?
This koginut squash dessert is incredibly versatile, so feel free to get creative with your serving options! Here are a few ideas:
Top it with a generous dollop of whipped cream or coconut whipped cream for extra richness.
Add a scoop of vanilla ice cream or spiced ice cream for a cool, creamy contrast.
For a touch of indulgence, drizzle with caramel sauce or sprinkle with a little cinnamon sugar before serving.
Pair it with a warm drink like chai tea, hot apple cider, or spiced coffee to complement the flavors and create a cozy experience.
8. How long will leftovers keep?
If you happen to have any leftovers, you’re in luck! This koginut squash dessert will keep in the fridge for up to 3-4 days. The flavors continue to develop, so don’t be afraid to enjoy it the next day. You can serve it chilled or warm it up for a fresh taste. Just make sure to store it in an airtight container to keep it fresh.
I hope these answers help you feel more confident as you make your own koginut squash dessert! If you have any other questions, feel free to leave them in the comments below I’d love